

ERR_CONNECTION_REFUSED – Explained With Solutions
Google chrome is a world-famous internet browser and when it found some problem in your internet connection it will start to show this ERR_CONNECTION_REFUSED error on your computers screen. Sometimes this error occurring while accessing some particular website or maybe sometime it shows on every website what you’ve opened.As I said It’s a Google Chrome problem and if you are using this browser in your operating system likes Windows, Mac, Linux or maybe Android, whatever you’re using in your computer its quietly possible you do suffering from this type of problem when ever time your device having some trouble with internet connection.
In this article I was talk about solutions for Windows and Mac operating system so just skip those step which is not for your OS and only follow those who’s applying to your OS.
#1 Clear Browser Cache Or Cookies
 Sometime this problem occurred by your browser history and cache and by cleaning it can easily fix this error:
- On your computer or laptop, open the Google Chrome.
- In the top right hang side, click on Menu .
- After that click on “Settings” and on down that page click on “Show advanced settings”.
- Under the “Privacy” section, click on the option name “Content settings”.

- In the “Cookies,” click on “All cookies and site data”.

- To delete all cookies just click on “Remove all”.
#2 Flushing DNS Setting

Normally your operating systems DNS client will automatically save the cache IP addresses or some other DNS stuffs too, in order to speed up subsequent requests to the same hostname and because of some saved corrupted cached results this problem can occurred and it will need to be cleared from that saved cache storage in order for your network to communicate with the hostname properly.
It’s possible your computer’s saved DNS cache got corrupted too and to fix it, you’ll need to flush all cached DNS from your computer and the given step below will help you to do it.
#How To Flush DNS On WINDOWS
All these procedure are same for all windows version:- First open the Run Commander in your windows by pressing the Windows Key +R keyat the same time.
- After that type the “cmd” in the text box and that will open your windows Command Prompt.

- Now type the command “ipconfig /flushdns” and then press enter, it will flush all cached DNS from your PC.

- After that restart your computer and test it, if the problem still stays then open the cmd again and try the 2nd command listed below.
- Second command: “netsh winsock reset catalog” (only try when the above once wont works).

#How To Flush DNS On Mac OS
Flushing the DNS in Mac OS X is an easy process, but the steps taken will depend on which version of OS X you are running. So, first open your Command terminal and type the command on it according to your OS versions which I’m all listed below.Note: Enter the command and then it will ask you to enter the password so, give it to the commander.
Note: Only this single command will fix the problem.
- For “Mac OS X El Capitan” Type: sudo killall -HUP mDNSResponder
- For “Mac OS X Yosemite” Type: sudo discoveryutil udnsflushcaches
- For “Mac OS X Mavericks” Type: sudo killall -HUP mDNSResponder
- For “Mac OS X Mountain Lion” Type: sudo killall -HUP mDNSResponder
- For “Mac OS X Lion” Type: sudo killall -HUP mDNSResponder
- For “Mac OS X Snow Leopard” Type: sudo dscacheutil -flushcache
- For “Mac OS X El Capitan” Type: sudo killall -HUP mDNSResponder
- For “Mac OS X El Capitan” Type: sudo killall -HUP mDNSResponder
- For “Mac OS X Leopard and below” Type: sudo lookupd -flushcache

#3 Reset Or Reinstalling Browser
You can also try to reset your chrome and maybe that can helps you to fix your ERR_CONNECTION_REFUSED.To Reset Your Chrome:
- Open your Chrome and click on the Chrome menu at the right hand top corner.
- Then Click on “Settings”.
- At the bottom of that page, click “Show advanced settings”.
- Under the section “Reset settings,” click Reset settings.
- In the box that appears, click Reset.
To Uninstall or Change a Program:
- Open Programs and Features by typing the “appwiz.cpl” command on run commander or you can also open it by the control panel.
- Then you’ll just need to Select your chrome and then click on Uninstall.
- After that download and install the fresh new chrome version from google chroem official website.
#4 Change DNS IP To Public DNS
Changing DNS does helps sometimes.@To change DNS Server IP in your windows:
- First go to the “Network and Sharing center” and you can easily open it by pressing “Windows key + R key” and then type the command name “ncpa.cpl”on the commander and click “OK”.

- When it gets opened, Click on the “Change adapter settings” option from the left hand side panel.
- Next right-click on your active internet connection adaptor (Local area network or Wireless area network).
- Then click on Properties.
- Select the “Internet Protocol Version 4 (TCP/IP v4)” option.
- Click on Properties (Yes, again, but it’s in a different window).
- Now select the “Use the following DNS server addresses”
- In the “Use The Following DNS Server Addresses” you’ll have the enter the suggested IP address given below
- In the first area “8.8.8.8”.
- In the second area ”8.8.4.4”.

@To change DNS Server IP in your Mac OS:
Step 1 – Go to your Mac System Preferences and select the Network panel setting (it will be listed in the Internet and Wireless section).
Step 2 – Now go to the Network preference pane and select your current network (Airport or Ethernet) and then click on “Advanced”.
Step 3 – After that select the DNS tab from the above menu.
Step 4 – Now in the DNS tab you’ll need to add the Google’s DNS servers using the “+” button.
DNS Server 1 (preferred): 8.8.8.8
DNS Server 2 (alternate): 8.8.4.4
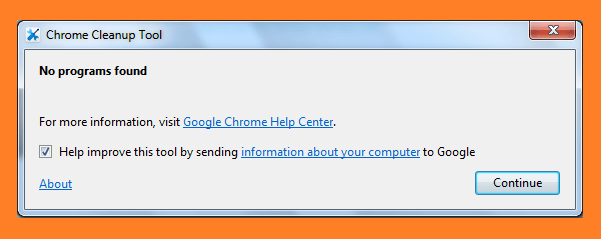
#5 Use Chrome Cleanup Tool
 On 2014 Google releases a beta version of cleanup tool that can scan your computer and remove software that may cause problems with Chrome. Now the beta version has long gone and that software works perfect on any computer and it will definitely fix your ERR_CONNECTION_REFUSED problem.
So, just download the tool from the link given below and run the program to fix issues:
https://www.google.com/chrome/cleanup-tool/
#6 Disable Firewall
I’m only showing you this disabling firewall process for windows, but not for mac or Linux because only windows having this firewall issue with internet connectivity.
- To turn off the firewall in windows you’ll need to go back to your windows control panel again and select the “Windows Firewall” option in it, you can also search in the search box by typing ‘Firewall’ in it.
- In your windows firewall setting, click on “Turn Windows Firewall on or off” option in the left side panel. Administrator permission required If you’re prompted for an administrator password or confirmation, type the password or provide confirmation.
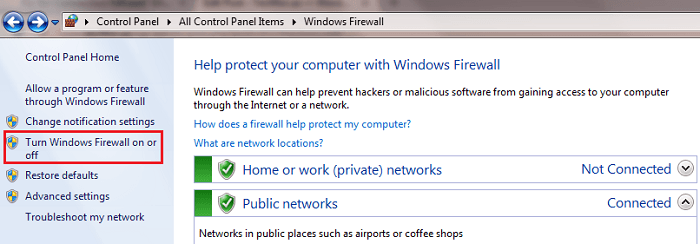
- Now select the “Turn off Windows Firewall (not recommended)” option under the network location and that will stops your protection, then click on “OK” to save the setting.
#What To Do If This “ERR CONNECTION TIMED OUT” Shows On Your Own Website?
If you’re a website owner, at least once in time you’ve do suffering from this “connection time out” error experience, and that’s the common problem if you’re using shared hosting plan for your website.This error fully indicates your website is down and whatever’s the reasons is, it can be your server who shuts off or maybe it can be the high traffic load which creating this problem.
If you’re a WordPress User you can try to do things listed below:
- The best thing to do is to make sure any plugins you are running are up to date and compatible with the WordPress version you are updating to. So, just go to Cpanel and open your Website’s main root directory and find the plugins folder and after finding it, just rename it by “plugins1” and save the new name. After that try to open your websites and if its works then rename that folder back to “plugins” and re-enable plugins one by one in your WordPress admin page.
- Contact your host provider is the best option you can try.
Hii guys, My name is Ganeshkumar and I’m a Computer Hardware Engineer and I proudly love to teach about computer software and hardware repairing stuffs. My hobby is blogging about computer problems solutions
ConversionConversion EmoticonEmoticon